
Have you ever wished you could harvest multiple types of apples from a single tree, or save a cherished family heirloom from fading away? It might sound like a far-off gardening dream, but it's entirely possible through the art of grafting. This age-old practice of joining a cutting (the scion) with a root system (the rootstock) allows you to create fruit trees that are more productive, resilient, and perfectly suited to your garden's needs. This guide will demystify various grafting techniques for fruit trees, giving you the confidence to create your very own custom fruit orchard. Let's grow together.
Why Grafting is a Game-Changer for Your Garden
Before diving into the "how," understanding the "why" makes the process feel less intimidating and a lot more exciting. Grafting helps you sidestep common gardening roadblocks and opens up a world of new possibilities.
Overcome Space Limits: Grow several types of fruit on a single tree—an absolute lifesaver for small yards and urban gardens.
Improve Fruit Quality: Join a scion known for its incredible fruit with a rootstock famous for its hardiness and disease resistance.
Preserve Heritage Varieties: Save an old, beloved tree (Malus domestica) by grafting its wood onto a healthy new rootstock, keeping its unique genetics alive for future generations.
Speed Up Fruiting: A scion from a mature, fruit-bearing tree will often produce fruit years earlier than a tree grown from seed.
But grafting is about more than just technique—it's about connection. When you source the perfect scionwood from a neighbor through Tendra's Twin Plant Mates feature, you turn a solo project into a shared community success. This guide will give you the confidence you need to make your first successful graft.
Getting Ready for a Successful Graft
A great graft starts long before you make the first cut. Think of it as a pre-op checklist for your fruit tree; getting these early steps right is just as important as the surgery itself. When you nail the prep work, you give your plant the best possible shot at a strong, healthy union.
Building the Right Toolkit
You don't need a massive toolbox, but having the right tools is a game-changer. Using generic equipment often leads to messy cuts and a graft that just won't take.
A Real Grafting Knife: This is one tool you can't skimp on. Unlike a standard utility knife, a true grafting knife has a single-beveled blade, allowing for perfectly flat, clean cuts critical for cambium contact.
Sharp Pruning Shears: You'll need a good, sharp pair for trimming your rootstock and collecting scionwood. Ensure they slice cleanly without crushing delicate plant tissue.
Grafting Tape: This isn't just regular tape; it's a protective skin for your graft. Materials like polyethylene film create a snug, waterproof seal that holds the union tight and prevents it from drying out.
Sterilizing Agent: A simple bottle of 70% isopropyl alcohol and a few clean rags are non-negotiable. Wipe down your tools before every cut to prevent spreading bacteria or fungi that could kill your graft.
Picking Your Plant Material
The health of your scion and rootstock is everything. You're choosing the genetic parents for a new tree, so be selective.
For the Scion (The Top Part):
You’re looking for healthy, dormant wood from last year's growth. It should be about the thickness of a pencil, free of any disease, damage, or flower buds. The best scions have plump, healthy leaf buds ready to grow.
For the Rootstock (The Base):
Find a strong, established plant compatible with your scion. Ideally, the rootstock should be actively growing or just waking from dormancy when you graft. This ensures its vascular system is ready to pump water and nutrients into its new addition.
The Secret to Success: Cambium Alignment
If you remember only one thing, make it this: the most critical factor for a successful graft is lining up the cambium layers of the scion and rootstock. This thin, greenish layer of tissue right under the bark is where all new cell growth happens. If those layers don't touch, the graft can't fuse. It’s as simple as that.
Nailing the Timing
Timing a graft is about syncing with your tree’s natural growth cycle. For most deciduous fruit trees, the sweet spot is late winter or early spring—just as the rootstock is waking up, but while the scion is still dormant.
This perfect window changes depending on where you live. Knowing your USDA Hardiness Zone is incredibly helpful for predicting when your trees will be in the ideal state.
Grafting Season and Timing Guide
This table is a great starting point, but always watch your own trees and weather. Sometimes, you'll need to adjust your timing.
Grafting Technique | Best Time of Year | Tree State | Target Fruit Trees |
|---|---|---|---|
Whip-and-Tongue | Late winter to early spring | Fully dormant | Apples, Pears, Plums |
Cleft Graft | Early spring | Rootstock waking up, scion dormant | Apples, Pears, Cherries, Peaches |
Budding (T-bud) | Mid-summer to early fall | Rootstock actively growing | Citrus, Apples, Peaches, Plums |
Bark Graft | Mid-spring | Bark is "slipping" on rootstock | Top-working larger, established trees |
Ultimately, a deep understanding of your local climate is key. Check out our guide on the USDA Planting Zone Chart to master your local gardening calendar and turn your grafting from a shot in the dark into a well-timed, strategic move.
Foundational Grafting Techniques for Every Gardener
Alright, you've got your sanitized tools and selected your plant material. Now for the moment of truth. While there are tons of methods, mastering a few core grafting techniques for fruit trees will set you up for success in almost any home garden scenario. We'll focus on three of the most dependable: the Cleft Graft, Whip-and-Tongue Graft, and T-Budding.
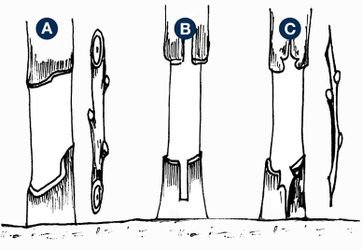
The Cleft Graft For Top-Working Trees
The cleft graft is a classic for a reason: it's straightforward and forgiving, making it a fantastic starting point. It’s your go-to method for top-working—changing the variety of an established tree or adding new types of fruit. You'll use this technique when your rootstock is much thicker than your scion wood.
Problem: You have a healthy apple tree that produces mediocre fruit, and you want to add a branch of a superior variety like Honeycrisp.
Solution:
Saw off a rootstock branch to create a clean, flat stump.
Carefully split the center of this stump down about 2-3 inches (5-7.5 cm).
Carve the bottom of two scions into long, tapered wedges. Make the outer edge of each wedge slightly thicker than the inner edge.
Gently slide one scion into each side of the split, paying close attention to aligning their outer cambium layers with the cambium of the rootstock.
Pro Tip: Because the rootstock bark is thicker than the scion bark, the scion's outer surface won't be perfectly flush. Set the scion in slightly to ensure the green cambium layers are touching. This tiny adjustment is often the difference between success and failure.
To finish, wrap the entire union tightly with grafting tape to hold the scions securely and seal the exposed wood.
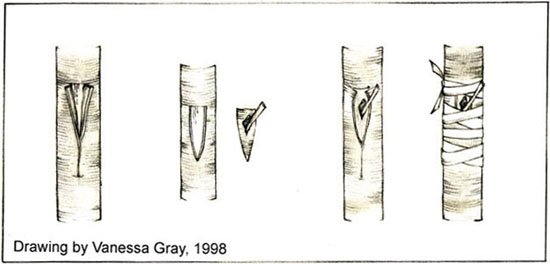
The Whip-and-Tongue Graft For Maximum Contact
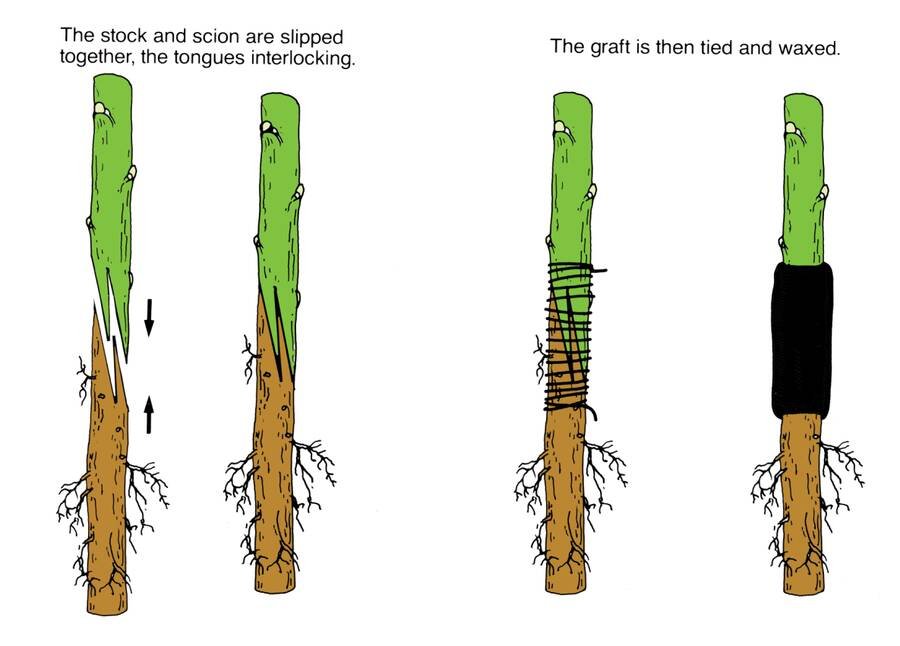
When your rootstock and scion are nearly the same diameter, the whip-and-tongue graft is king. It demands more precision but results in an incredibly strong union with a huge surface area for cambium contact, meaning a much higher success rate. This is perfect for grafting young saplings.
This visual guide shows the intricate cuts of the whip-and-tongue method, designed for maximum cambium contact and a strong, stable union.
The interlocking nature of these cuts provides structural stability even before wrapping, preventing the pieces from slipping while you secure them.
You start by making a long, smooth, diagonal slice on both the scion and rootstock, about 1.5 inches (4 cm) long. Then, about a third of the way down from the tip of each diagonal cut, make another slice down into the wood to create a thin "tongue." These two tongues let the scion and rootstock lock together like puzzle pieces. Gently slide them together until the cambium layers on at least one side line up perfectly, then wrap tightly. Check out our other gardening tips for more community-sourced wisdom.
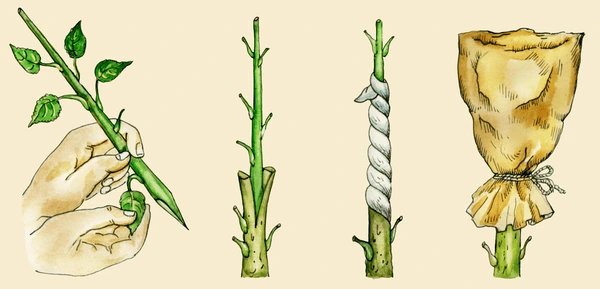
T-Budding For Summer Grafting
Unlike methods that use a whole stem section, budding uses just a single bud. T-budding is typically done in mid-summer when the rootstock's bark is "slipping"—meaning it pulls away from the wood easily. This technique is super efficient and is the standard for propagating citrus, roses, and stone fruits like peaches (Prunus persica).
To do a T-bud, make a T-shaped cut in the rootstock's bark. The vertical line is about 1 inch (2.5 cm) long, and the horizontal cut at the top goes about a third of the way around the stem. Gently pry the corners open. Next, slice a healthy, plump bud off your scion wood with a small, shield-shaped piece of bark attached. Slide this "bud shield" down into the T-shaped opening until it’s tucked snugly beneath the bark flaps. Finally, wrap the area with budding tape, leaving the bud itself exposed to grow.
Advanced Grafting: Rescuing and Rejuvenating Trees
Once you've got the basics, you can start tackling more complex problems. Think of these as the specialized tools in your horticultural kit—the ones you pull out for unique and challenging situations.
The Bridge Graft: A Lifeline for Damaged Trees
It’s a gut-wrenching sight: a young fruit tree with its trunk severely damaged by rodents or a lawnmower. This girdling severs the cambium and is often a death sentence. But the bridge graft can be a lifesaver. This technique creates a living "bridge" for nutrients to bypass the wound. You'll use several long scions to span the gap, tucking one end under the bark below the wound and the other end above it. By installing several of these bridges, you restore the flow of sap and keep the tree alive.
The Inarch Graft: A Root System Transplant
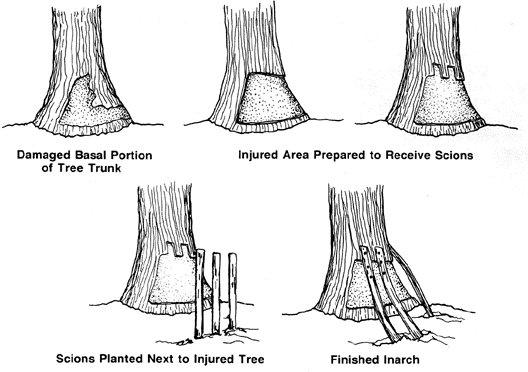
What if your tree’s problem is underground? A mature tree with a failing root system can be heartbreaking, but inarch grafting offers a last-ditch effort to save it. It’s the horticultural equivalent of a root transplant. You plant one or more healthy saplings next to the struggling tree's trunk. Once established, you scrape away a strip of bark on the main trunk and a matching strip on the sapling, press the exposed cambium surfaces together, and secure them. Over time, they'll fuse, and the sapling's healthy root system will begin to support the mature tree.
Top-Working: An Extreme Makeover
Sometimes you have a big, healthy tree that just produces terrible fruit. Instead of removing it, you can give it a complete makeover through top-working. This ambitious project lets you change the entire fruit-bearing canopy to a new, better variety.
Did you know? Through top-working, a tree that once produced sour apples can be yielding baskets of sweet, crisp Honeycrisps within just two to three years, all without planting a new tree.
You'd typically prune the main limbs back to sturdy stumps in late winter. Then, in early spring, use methods like the bark graft or cleft graft to insert scions of your desired variety. Because the tree already has a massive root system, these new scions often grow with explosive vigor.
Post-Graft Care: Protecting Your Work
Your job isn’t over once the final wrap is secure. The next few weeks are a critical healing period where your attentive aftercare can make all the difference.
Shielding Your New Graft
For the first few weeks, your graft is incredibly vulnerable. A gust of wind, a curious bird, or scorching sun can undo all your hard work.
Wind and Physical Damage: Drive a sturdy stake into the ground nearby and loosely tie the rootstock to it for support.
Sun Protection: Create a temporary shield by loosely tenting the graft with aluminum foil (shiny side out) or painting the scion with a diluted 50/50 solution of white interior latex paint and water.
Pest Patrol: Loosely place a paper bag over the graft or install shiny foil strips to keep birds from perching on it.
Directing the Tree's Energy
As the days warm up, your tree will try to grow its own shoots and suckers below the graft union. You must prune these away immediately. If you let them grow, they will steal vital water and nutrients, starving your scion and dooming the graft to fail.
A Critical Sign of Success: The first real sign you’ve succeeded is the swelling of buds on your scion. As long as the scion wood remains plump and greenish, the union is likely forming. A shriveled, brown scion, however, is a clear sign of failure.
Common Grafting Problems and Solutions
Even experienced gardeners have grafts that fail. Being able to spot the problem early is key to learning from it.
Symptom | Likely Cause | Solution or Prevention Tip |
|---|---|---|
Scion shrivels and turns brown | The graft union has failed due to poor cambium contact, cut surfaces drying out, or incompatibility. | Review your cutting technique for better cambium alignment. Work faster and keep cut surfaces pristine. |
Callus forms, but buds don't break | The scion may have been unhealthy, damaged by cold, or the buds were flower buds instead of leaf buds. | Always select healthy, dormant scionwood from the previous year's growth with prominent leaf buds. |
Graft initially grows, then dies | This could be a delayed incompatibility reaction, disease, or later damage to the union. | Ensure the graft is well-supported as it grows. If you suspect disease, identify and treat it quickly. |
Excessive sap "bleeding" from union | The graft was likely done too late in the season when sap flow was already too strong, pushing the union apart. | For most deciduous trees, graft in late winter or the first days of early spring before the strong sap rise begins. |
Sometimes it's hard to tell if a graft is failing due to technique or an underlying disease. If you see unusual spots or wilting, Tendra’s AI disease diagnosis can help. By comparing a photo to our extensive database, you can figure out what's really going on. You can learn more about how to identify plant diseases with our detailed guide.
Real-World Application: Sarah's Fruit Cocktail Tree
Let's put all this theory into context. Imagine Sarah, a home gardener in Portland (USDA Zone 8b). She has a mature apple tree, but the fruit is underwhelming. With no space for more trees, she dreams of picking crisp Honeycrisp and sweet Fuji apples.
This is a classic gardener's dilemma. Using Tendra, she finds the Twin Plant Mates feature and connects with a local grower who happily shares dormant scionwood from his prized Honeycrisp and Fuji (Malus domestica) trees. That's the magic of community—gardeners are incredibly generous.
That winter, Sarah uses the cleft grafting method to add two Fuji branches. The next spring, riding that success, she uses T-budding to add several Honeycrisp buds. Two years later, her once-boring tree is a mini-orchard producing three different apples. Sarah's story shows what's possible when you combine know-how with community.
The increase in home orchards is part of a wider trend, with the global market for grafted fruit trees expected to reach USD 878 million by 2031. More details can be found on reports.valuates.com.
Your Grafting Questions, Answered
Jumping into grafting can feel a little intimidating. Here are some of the most common questions from our Tendra community.
Fruit Tree Grafting Compatibility
Compatibility is essential for successful grafting. Generally, grafting works well within the same genus. Here are some compatible fruit families:
Apple and Pear Family (Malus and Pyrus): Apples can be grafted with other apple varieties, and pears can often be grafted with apples due to their close genetic relationship.
Citrus Family (Citrus): Various citrus fruits, like oranges, lemons, and limes, can be grafted onto each other.
Stone Fruit Family (Prunus): Peaches, apricots, plums, and cherries can typically be grafted within this group, as they share a close genetic lineage.
How Long Does It Take for a Graft to Heal?
Patience is a virtue in gardening. You should start seeing positive signs—like buds swelling on your scion—within 3 to 8 weeks. As long as the scion stays plump and green, you can be confident the healing process is happening. You'll typically see vigorous new growth during the first growing season.
What Is the Top Reason Grafts Fail?
Hands down, the number one culprit is poor cambium contact. The cambium is that thin, greenish layer just under the bark. For the scion and rootstock to fuse, these two layers must line up perfectly on at least one side. Without this connection, the vascular systems can't join, and the scion will be starved of water and nutrients. Other common reasons include bad timing, dehydration of cut surfaces, and unhealthy plant material. Getting these details right is what separates frustration from a successful harvest.
Mastering grafting techniques for fruit trees transforms you from a plant owner into a plant creator. It’s a journey of learning, patience, and connection—not just with your trees, but with a community of fellow growers. Your journey into grafting doesn't have to be a solo one. Discover local scionwood, share your successes, and get expert advice with Tendra—where local gardeners connect and thrive.


